
結果出現好幾頁的工具,看來有點複雜,決定還是由基礎開始。
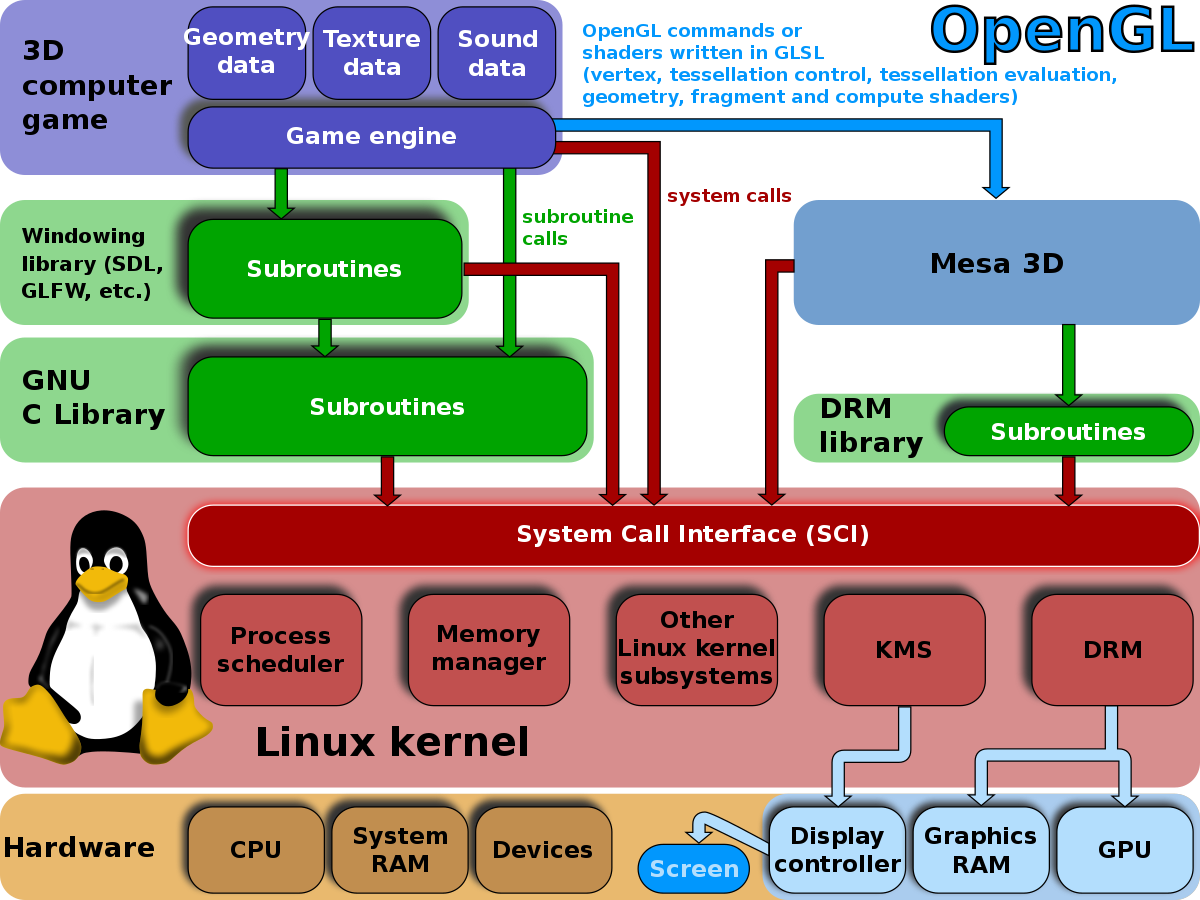
這是大致上的架構。
研究了這一堆的工具之後,決定選擇 FreeGLUT 作為開發的實驗平台。先下載工具:
root@luke-G50:/home/dang# apt-get install freeglut3 freeglut3-dev libglew-dev <Enter>
Reading package lists... Done
Building dependency tree
Reading state information... Done
freeglut3 is already the newest version.
freeglut3 set to manually installed.
The following packages were automatically installed and are no longer required:
libbonobo2-0 libbonobo2-common libdbusmenu-gtk4 libgconf2-4 libgnome2-0
libgnome2-bin libgnome2-common libgnomevfs2-0 libgnomevfs2-common
libidl-common libidl0 liborbit-2-0 liborbit2 libqpdf13
...
接下來還需要裝MESA開發工具:
root@luke-G50:/home/dang# apt-get install mesa-utils
root@luke-G50:/home/dang# mkdir 3D
root@luke-G50:/home/dang# cd 3D
root@luke-G50:/home/dang# vi example1.c
#include "GL/freeglut.h"
#include "GL/gl.h"
void drawSquare()
{
glClearColor(0.4, 0.4, 0.4, 0.4);
glClear(GL_COLOR_BUFFER_BIT);
glColor3f(1.0, 1.0, 1.0); /* 1.0, 1.0, 1.0 is white */
glOrtho(-1.0, 1.0, -1.0, 1.0, -1.0, 1.0);
glBegin(GL_SQUARE);
glVertex3f(-0.7, 0.7, 0);
glVertex3f(0.7, 0.7, 0);
glVertex3f(0, -1, 0);
glVertex3f(0, -1, 0);
glEnd();
glFlush();
}
int main(int argc, char **argv)
{
glutInit(&argc, argv);
glutInitDisplayMode(GLUT_SINGLE);
glutInitWindowSize(500, 500);
glutInitWindowPosition(100, 100);
glutCreateWindow("OpenGL - Creating a square");
glutDisplayFunc(drawSquare);
glutMainLoop();
return 0;
}
在OpenGL初始化完成之後,首先是設定要把圖畫到一個三維的區域之中,這裡glOrtho(left, right, bottom, top, near, far) 來做設定。
glOrtho()一般用於物體不會因為離螢幕的遠近而產生大小的變換的情況。反過來,在真實生活中,人們視野觀測物體的真實情況。例如:觀察兩條平行的火車到,在過了很遠之後,這兩條鐵軌是會相交於一處的。還有,離眼睛近的物體看起來大一些,遠的物體看起來小一些。這時候畫圖就要別的函數。
glOrtho(left, right, bottom, top, near, far), left表示視景體左面的座標,right表示右面的座標,bottom表示下面的,top表示上面的。這個函數簡單理解起來,就是一個物體擺在那裡,你怎麼去截取他。假設有一個方形立方體,圓心在(0, 0, 0),那麼,我們可以設定glOrtho(-1, 1, -1, 1, -10, 10)。
root@luke-G50:/home/dang/3D# cc example1.c -l glut -lGL -o tt <Enter>
然後回到X-Windows DEsktop之下,找到tt點下去。就看到了這個三角形。
沒有留言:
張貼留言